
Welcome to my comprehensive guide on hardware security! Today, we’ll delve into the fascinating world of evaluating and understanding hardware devices, focusing on a popular target for beginners – the TP-Link TL-WR841N wireless router. Throughout this journey, we’ll explore the tools and techniques necessary for extracting firmware, accessing the Linux terminal, and uncovering potential vulnerabilities.
Gathering Information
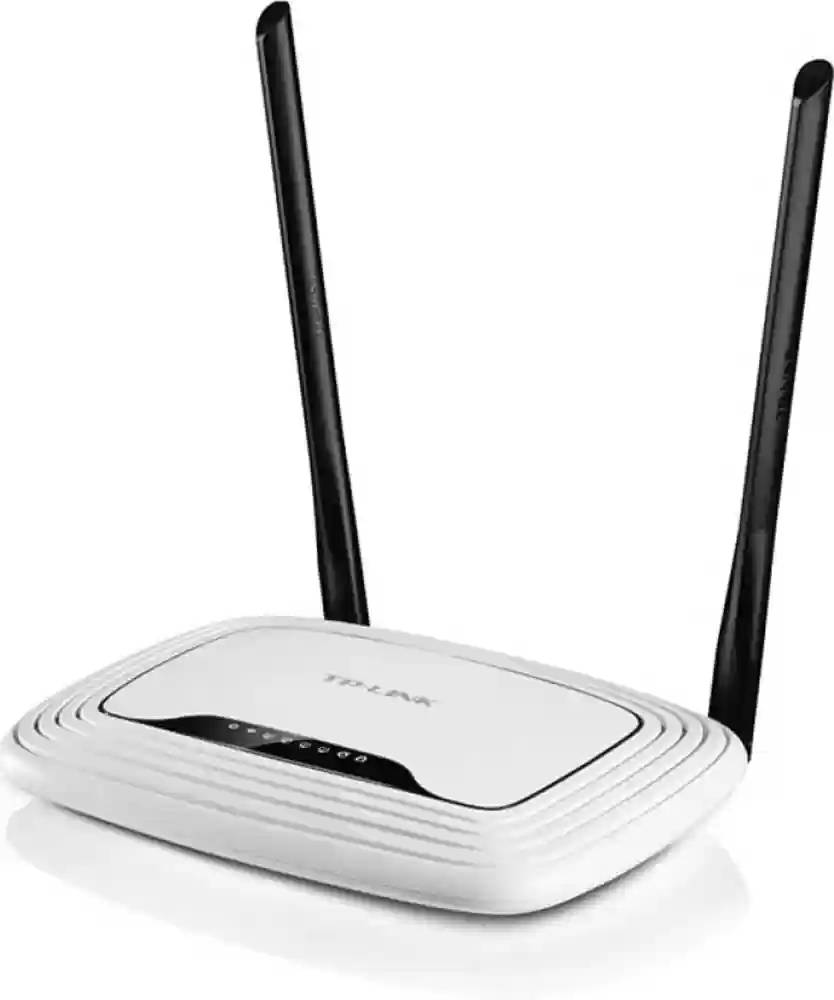
Before diving into the hardware itself, it’s crucial to gather information about your target device. In our case, the TP-Link router boasts a 300 Mbps speed and is known for its ease of use in the realm of hardware security. A preliminary online search can reveal valuable insights into the device’s chipsets, operating system, and radio frequencies. Additionally, checking the FCC ID (if applicable) can provide internal images and other specifications.
Why Bother with Gathering Information?
Imagine you’re a detective on a high-stakes case. You wouldn’t just barge into a suspect’s house without some background knowledge, would you? The same principle applies here. Knowing the ins and outs of your router helps you avoid nasty surprises and gives you a roadmap for what to expect.
Diving Deeper: Tools and Resources
- Datasheets: These are your best friends. They provide detailed specifications and pinouts of the chips you’ll encounter. Websites like Alldatasheet and DatasheetCatalog are goldmines.
- Community Forums: Sites like Reddit and specialized hardware hacking forums can offer invaluable tips and tricks from folks who’ve been there, done that.
- Official Documentation: Always check the manufacturer’s website for manuals and firmware updates. These often contain nuggets of useful information.
Back in the day, I spent hours scouring the internet for information about my first router. It was a frustrating yet exhilarating scavenger hunt. The sense of accomplishment when I finally had all the pieces was like finishing a particularly tricky jigsaw puzzle.
Why Information Matters in Hardware Security
Understanding the inner workings of your device is akin to a surgeon understanding human anatomy before performing an operation. Without this foundational knowledge, you could inadvertently cause more harm than good. This information guides you through the intricate landscape of your hardware, making it easier to identify vulnerabilities and implement security measures.
Sources of Information
Datasheets
Datasheets provide a detailed description of the functionality and design of a component. They are essential for understanding the specifications and capabilities of the chipsets within your device.
Community Forums
Online forums like Reddit, Stack Overflow, and specialized hardware hacking communities are treasure troves of practical advice. Here, experienced hackers and enthusiasts share their experiences, solutions, and insights, which can be invaluable for a beginner.
Official Documentation
Manufacturer websites often host a wealth of information, including user manuals, firmware updates, and troubleshooting guides. These documents can offer critical insights into the device’s intended operation and capabilities.
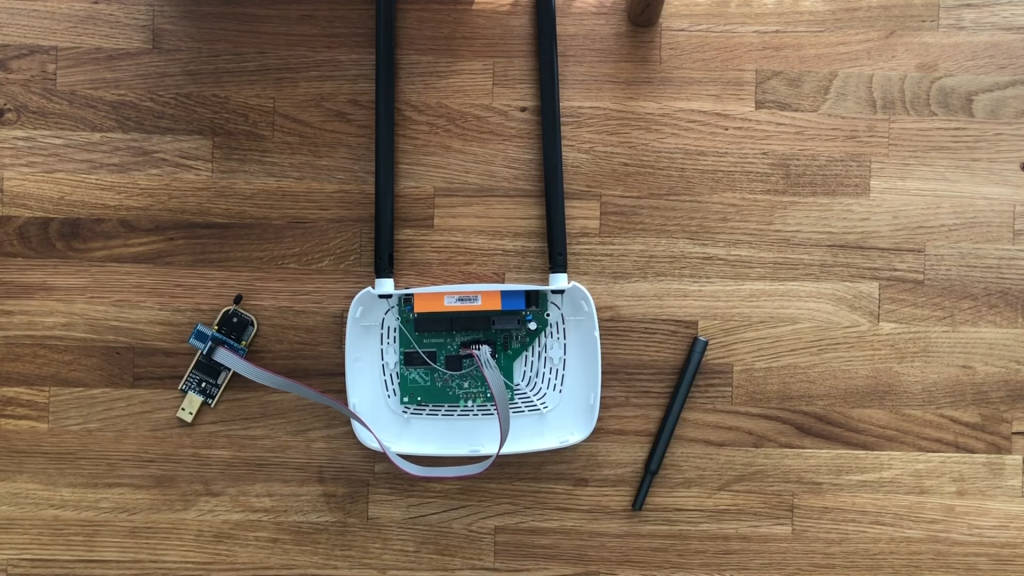
Opening the Device
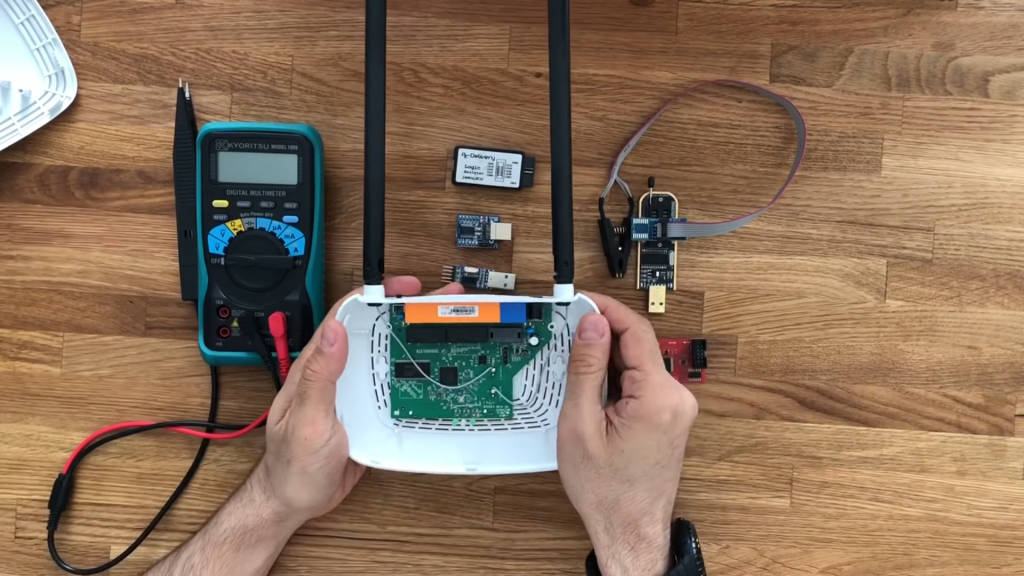
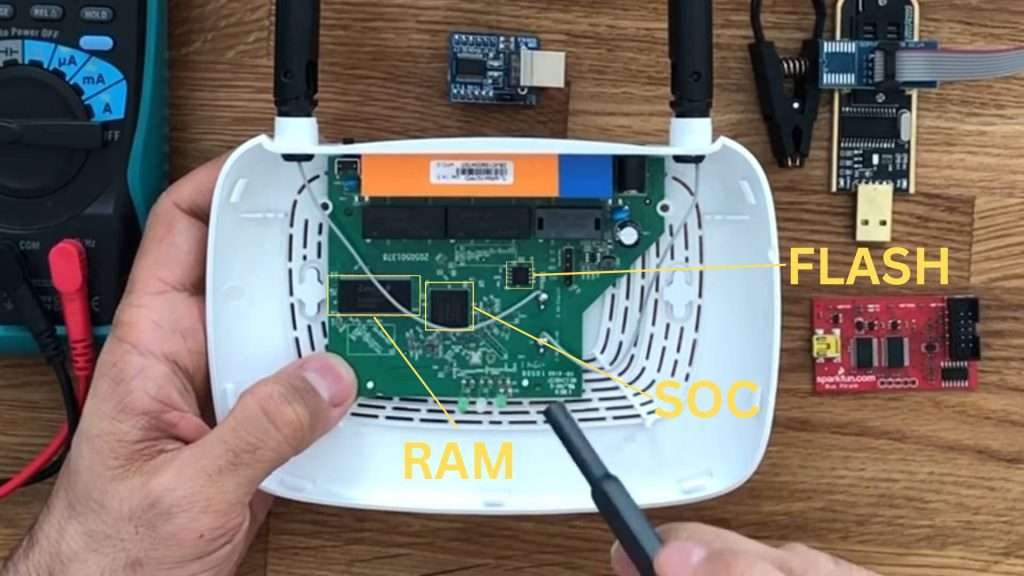
With two simple screws, the TP-Link router is easily opened, exposing its internal components. Three key chipsets are visible:
- System-on-Chip (SOC): This powerful chip houses the microprocessor and various controllers, including the USB micro-controller. It acts as the heart of the system.
- Read-Only Memory (ROM): This chip stores the firmware (flash) of the device.
- Random Access Memory (RAM): This chip temporarily holds data for the device’s operation.
Identifying these chips is made easier thanks to the part numbers printed on them, which can be referenced online for detailed data sheets.
Popping open a device feels a bit like unwrapping a present, doesn’t it? There’s that mix of anticipation and slight anxiety—will everything be where it’s supposed to be? Will there be hidden surprises? It’s all part of the fun.
Ever tried explaining to your non-techy friends why you’re so excited about opening a router? The looks I get are priceless. “You’re doing what now?” they ask, as if I’ve said I’m planning to tame a dragon.
Getting Your Hands Dirty
Opening up your device is the first physical step in your journey into hardware security. It provides a tangible connection to the abstract concepts and theories you’ve read about. There’s something inherently satisfying about seeing the physical manifestation of what was once just a schematic in a datasheet.
Safety First
Before you dive in, it’s crucial to observe safety precautions:
- Static Electricity: Always use an anti-static wrist strap to prevent static discharge from damaging the sensitive electronic components.
- Tools: Use appropriate tools like precision screwdrivers, plastic prying tools, and tweezers to avoid damaging the components.
Identifying Components
Once the device is open, the next step is to identify and understand the components. The major components you’ll encounter include:
System-on-Chip (SoC)
The SoC integrates the major functional blocks of a computer onto a single chip. It includes the CPU, memory controllers, and interfaces.
Read-Only Memory (ROM)
This non-volatile memory stores the firmware, the permanent software programmed into the device.
Random Access Memory (RAM)
RAM is the volatile memory that temporarily holds data for the CPU’s use. It’s faster than ROM but loses its data when the power is off.
The Process of Disassembly
- Remove the Screws: Use a precision screwdriver to remove the screws holding the case together.
- Pry Open the Case: Use a plastic prying tool to gently separate the case halves. Be careful not to snap any plastic clips.
- Disconnect Any Connectors: If there are any connectors or ribbon cables, carefully disconnect them to fully separate the case.
Extracting the Firmware
To analyze and understand the device’s inner workings, extracting the firmware is essential. There are a few options for achieving this:
- Download: The simplest method involves downloading a firmware update file from the vendor’s website.
- Serial Interface: Connecting to the device via a serial interface allows for copying individual files or dumping the entire firmware.
- Firmware Extraction Tools: Specialized tools, which we’ll discuss later, enable direct extraction of the firmware.
The ability to read and write firmware directly on the device is invaluable for fixing bricked devices, removing BIOS passwords, and bypassing hardware limitations. Notably, even though the ROM chip is labeled as “read-only,” it is an Electrically Erasable Programmable Read-Only Memory (EEPROM) that can be modified with the right tools.
Delving into Firmware Extraction
Firmware extraction is like reading the DNA of your device. It tells you how everything is put together and can reveal vulnerabilities or hidden features.
Tools of the Trade
- Bus Pirate: A versatile tool that can speak many different protocols, making it invaluable for hardware hacking.
- Flashrom: A command-line utility for reading, writing, verifying, and erasing flash chips.
- OpenOCD: Useful for debugging and programming ARM processors.
I once had a router that was so stubborn, it felt like it had a personal vendetta against me. But after a few hours of wrestling with it, I managed to extract the firmware. The sense of victory was akin to winning a small battle.
Understanding Firmware
Firmware is the software that is programmed into the read-only memory of a device. It controls how the device operates and interacts with other hardware. Extracting and analyzing firmware can provide deep insights into the device’s functionality and potential vulnerabilities.
Methods of Firmware Extraction
Downloading Firmware
Most manufacturers provide firmware updates on their websites. Downloading these updates can be a quick and easy way to obtain the firmware for analysis.
Using a Serial Interface
Connecting to the device via a serial interface (like UART) allows you to interact with the device’s firmware directly. This method requires a bit more technical know-how but can be very powerful.
Specialized Firmware Extraction Tools
Tools like Flashrom and Bus Pirate can be used to read the contents of the firmware directly from the ROM chip. These tools are essential for extracting firmware from devices that do not have readily available updates.
The Extraction Process
- Identify the ROM Chip: Locate the ROM chip on the device’s circuit board. Refer to the datasheet for its pinout and specifications.
- Connect the Tools: Use the appropriate tools (e.g., Bus Pirate, Flashrom) to connect to the ROM chip.
- Read the Firmware: Use the software tools to read the contents of the ROM chip and save it to a file for analysis.
Analyzing the Firmware
Once you have extracted the firmware, the next step is to analyze it. This involves using various tools and techniques to understand its structure and contents.
Tools for Firmware Analysis
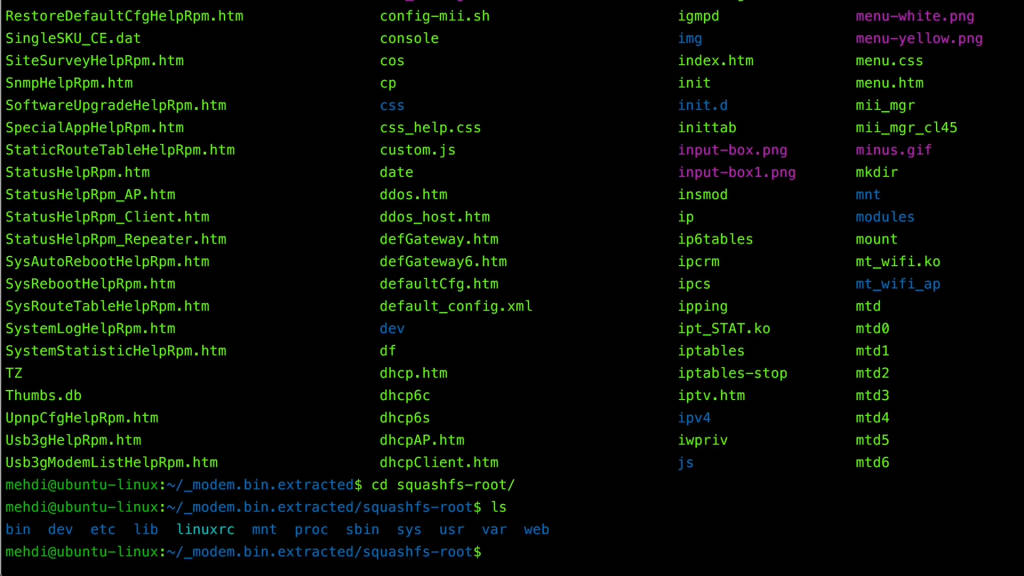
- Binwalk: A tool for analyzing binary firmware images. It can identify and extract embedded file systems and executables.
- Hex Editors: Tools like HxD or Hex Fiend allow you to view and edit the raw hexadecimal data of the firmware.
- Disassemblers: Tools like Ghidra or IDA Pro can disassemble the firmware code, allowing you to analyze its functionality.
Practical Example: Extracting Firmware from a TP-Link Router
- Download the Firmware: Visit the TP-Link website and download the latest firmware update for the TL-WR841N router.
- Analyze with Binwalk: Use Binwalk to analyze the downloaded firmware file. This will give you an overview of its structure and contents.
- Extract Embedded Files: Use Binwalk’s extraction features to pull out embedded file systems and executables for further analysis.
- Disassemble Code: Use a disassembler to analyze the firmware code and look for potential vulnerabilities or interesting features.
Extracting firmware can sometimes feel like peeling an onion. There are many layers, and sometimes it makes you want to cry. But each layer brings you closer to the core, where all the interesting stuff is.
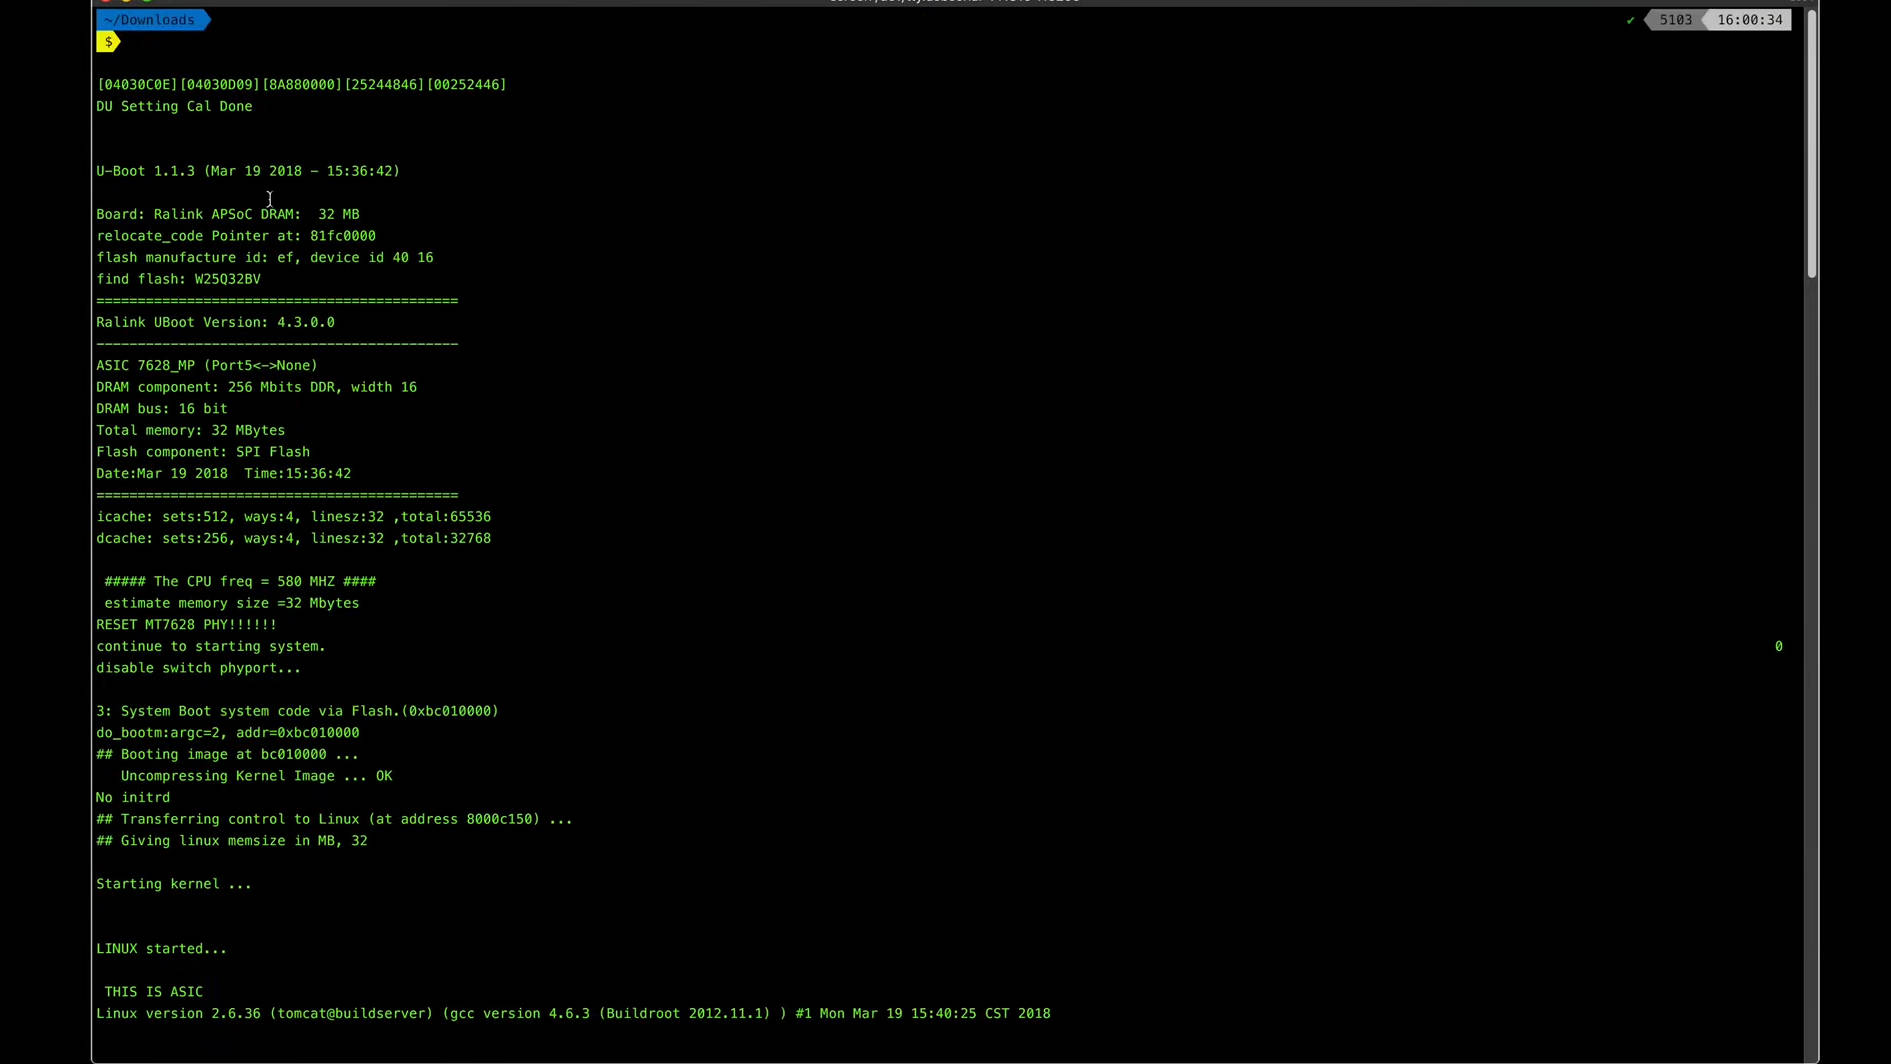
Accessing the Linux Terminal
To connect to the device’s Linux terminal, we’ll utilize the Universal Asynchronous Receiver Transmitter (UART) interface, a common serial interface found on many devices. By locating the UART pins on the board and using a USB to UART adapter, we can bridge the connection between the device and our computer.
Remember to connect the ground (GND) pins and ensure that the receiver (Rx) of the adapter is connected to the transmitter (Tx) of the device, and vice versa. A multimeter can be used to determine the device’s logic level (3.3V or 5V) to avoid damage during connection.
Once connected, we can use a terminal emulator to interact directly with the device’s Linux terminal, providing us with a wealth of information and control.

The Intrigue of UART
UART interfaces are like the secret passageways of the hardware world. They’re hidden in plain sight, often just a few unassuming pins on a circuit board, yet they offer a direct line into the device’s brain.
Tools for the Job
- PuTTY or Tera Term: Popular terminal emulators that make it easy to communicate with your device.
- FTDI Adapter: A reliable USB to UART adapter.
- Logic Analyzer: For more complex debugging, a logic analyzer can be invaluable.
Connecting to the UART interface for the first time feels like hacking into the Matrix. Except instead of dodging bullets, you’re dodging electrical mishaps. And your reward? Lines of scrolling text that make you feel like a true cyber detective.
Accessing the UART Interface
Locate the UART Pins
The first step is to locate the UART pins on the device’s circuit board. These pins are often labeled as Tx (transmit), Rx (receive), and GND (ground).
Connect the Adapter
Use a USB to UART adapter to connect your computer to the device. Ensure that the connections are correct: Tx on the adapter goes to Rx on the device, and Rx on the adapter goes to Tx on the device. Connect the GND pins as well.
Set Up the Terminal Emulator
Open a terminal emulator like PuTTY or Tera Term on your computer. Configure it to use the correct COM port and baud rate (typically 115200 for many devices).
Power On the Device
With the connections in place, power on the device. You should see boot messages in the terminal emulator, giving you access to the device’s Linux terminal.
Interacting with the Linux Terminal
Once you have access to the Linux terminal, you can issue commands to the device just like you would with any other Linux system. This allows you to explore the file system, check configurations, and even modify settings.
Common Commands
- ls: List directory contents.
- cd: Change directory.
- cat: Display file contents.
- dmesg: Display system messages.
- ifconfig: Configure network interfaces.

Practical Example: Accessing the UART Interface on a TP-Link Router
- Locate the UART Pins: Open the router and locate the UART pins. They are often labeled on the circuit board.
- Connect the Adapter: Use a USB to UART adapter to connect to the pins. Double-check your connections to ensure they are correct.
- Open the Terminal Emulator: Launch PuTTY and configure it to use the correct COM port and baud rate.
- Power On the Router: Turn on the router and watch the terminal emulator for boot messages.
- Explore the Terminal: Once connected, use basic Linux commands to explore the router’s file system and configurations.
Common Challenges
- Incorrect Connections: Double-check that the Tx and Rx pins are connected correctly. A common mistake is to connect Tx to Tx and Rx to Rx, which won’t work.
- Baud Rate Mismatch: Ensure that the terminal emulator is configured with the correct baud rate. If unsure, 115200 is a good starting point.
- Power Issues: Ensure the device is properly powered on. Sometimes the UART interface won’t respond if the device isn’t fully powered.
Advanced Tips
- Using a Logic Analyzer: For more advanced debugging, a logic analyzer can help you understand the data being transmitted over the UART interface.
- Adding UART Headers: If your device doesn’t have a UART header, consider soldering one on. This makes future connections easier.
- Custom Firmware: If you have custom firmware, you can add scripts or tools that make interacting with the device over UART more powerful and versatile.
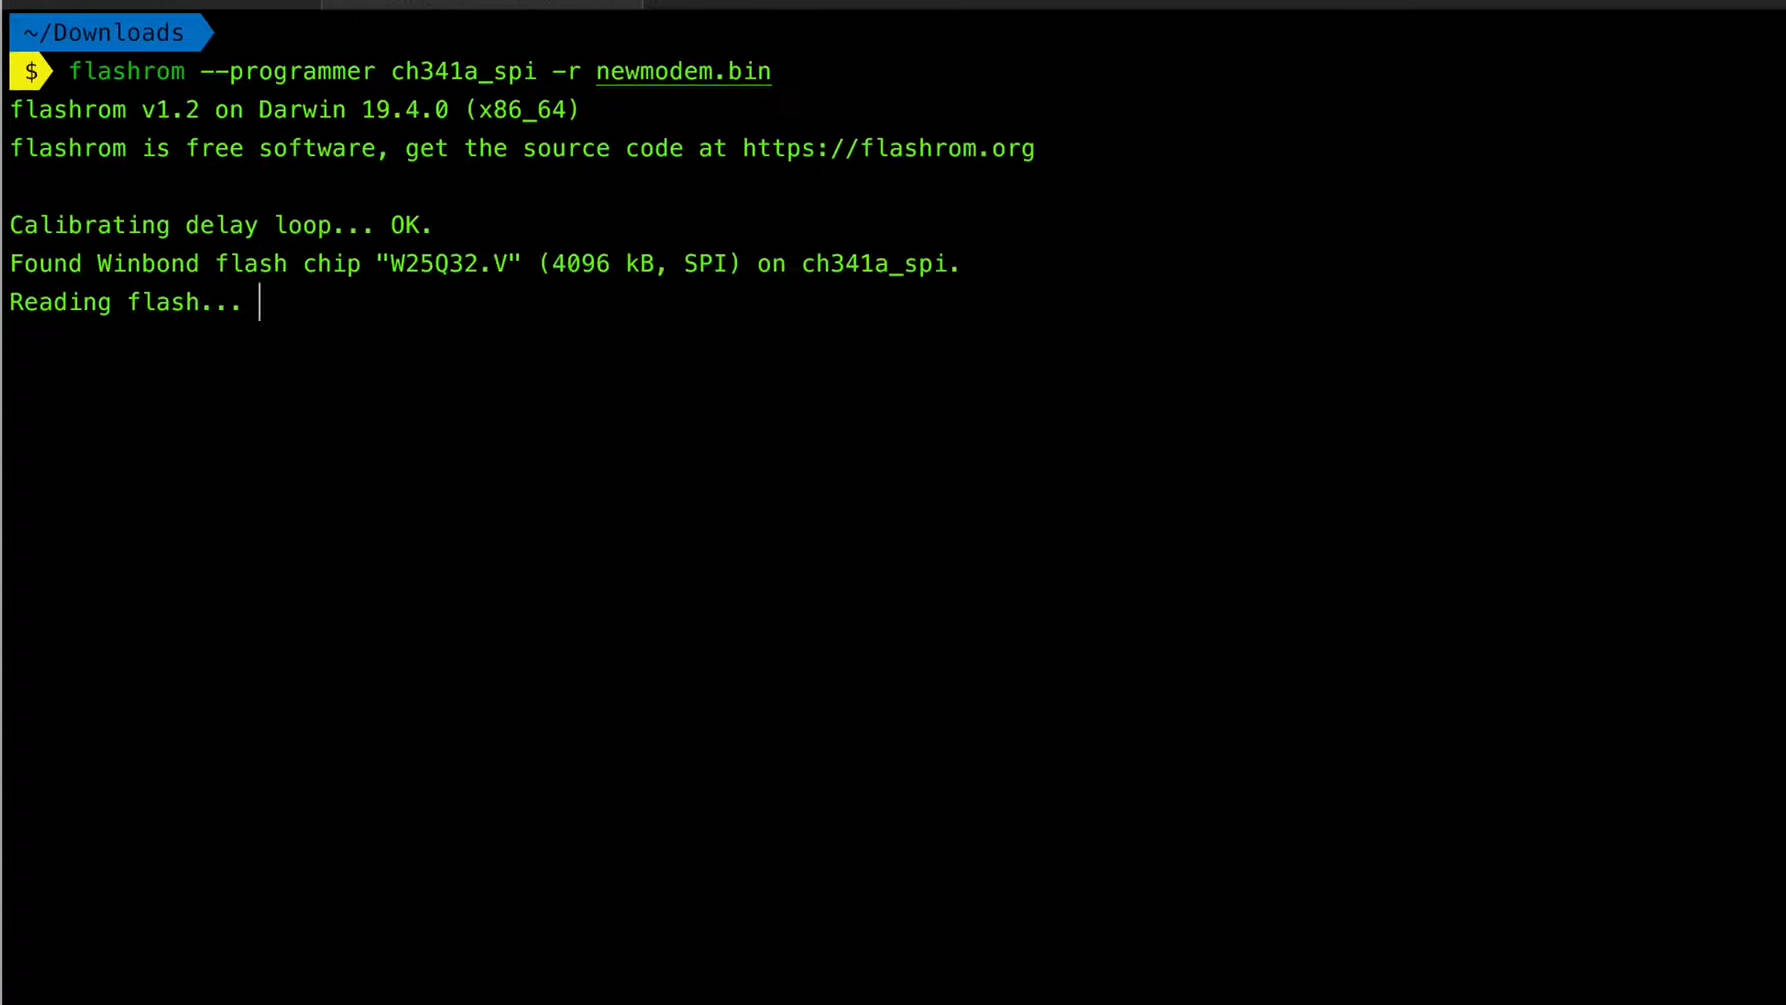
Dumping the Firmware with SPI
To extract the entire firmware, we’ll utilize the Serial Peripheral Interface (SPI) protocol and a programmer tool. An SPI flash programmer connects to the EEPROM chip on the board, allowing us to dump the contents into a binary file.
After extraction, tools like Binwalk can be used to analyze the firmware image, revealing its structure and potential vulnerabilities. The firmware often contains bootloaders, compressed data sections, and file systems like SquashFS, which can be explored for further analysis.
The Art of SPI Dumping
Dumping firmware via SPI is like performing a delicate surgical procedure. It requires precision, patience, and the right tools.
Recommended Tools
- CH341A Programmer: A budget-friendly yet effective SPI programmer.
- Clip Adapter: For easily attaching to EEPROM chips without soldering.
- Binwalk: A tool specifically designed for analyzing firmware images.
Personal Anecdote:
I remember my first successful SPI dump like it was yesterday. It was a mix of jubilation and relief—jubilation because it worked, and relief because I didn’t fry the chip in the process.
Understanding SPI
The Serial Peripheral Interface (SPI) is a synchronous serial communication interface used for short-distance communication, primarily in embedded systems. It’s widely used for connecting microcontrollers to peripherals such as sensors, SD cards, and shift registers.
The Dumping Process
Identify the SPI Flash Chip
Locate the SPI flash chip on the device’s circuit board. Refer to the datasheet for its pinout and specifications.
Connect the Programmer
Use an SPI flash programmer (like the CH341A) to connect to the flash chip. A clip adapter can be helpful for making the connection without soldering.
Read the Firmware
Use the programmer software to read the contents of the flash chip and save it to a file.
Practical Example: Dumping Firmware from a TP-Link Router
- Identify the Flash Chip: Open the router and locate the SPI flash chip on the circuit board. Refer to the datasheet for its pinout and specifications.
- Connect the Programmer: Use a CH341A programmer with a clip adapter to connect to the flash chip. Ensure the connections are secure.
- Read the Firmware: Use the programmer software to read the contents of the flash chip and save it to a binary file.
- Analyze with Binwalk: Use Binwalk to analyze the firmware file, extracting embedded file systems and executables for further analysis.
Advanced Tips
- Backup the Original Firmware: Always make a backup of the original firmware before making any modifications. This allows you to restore the device to its original state if something goes wrong.
- Use a Desoldering Station: For a more permanent connection, consider desoldering the flash chip and connecting it directly to the programmer.
- Understand the Flash Layout: Knowing the layout of the flash memory can help you identify important sections like the bootloader, kernel, and file system.
Firmware Analysis
Once you’ve dumped the firmware, the next step is to analyze it. This involves using various tools and techniques to understand its structure and contents.
Tools for Firmware Analysis
- Binwalk: A tool for analyzing binary firmware images. It can identify and extract embedded file systems and executables.
- Hex Editors: Tools like HxD or Hex Fiend allow you to view and edit the raw hexadecimal data of the firmware.
- Disassemblers: Tools like Ghidra or IDA Pro can disassemble the firmware code, allowing you to analyze its functionality.
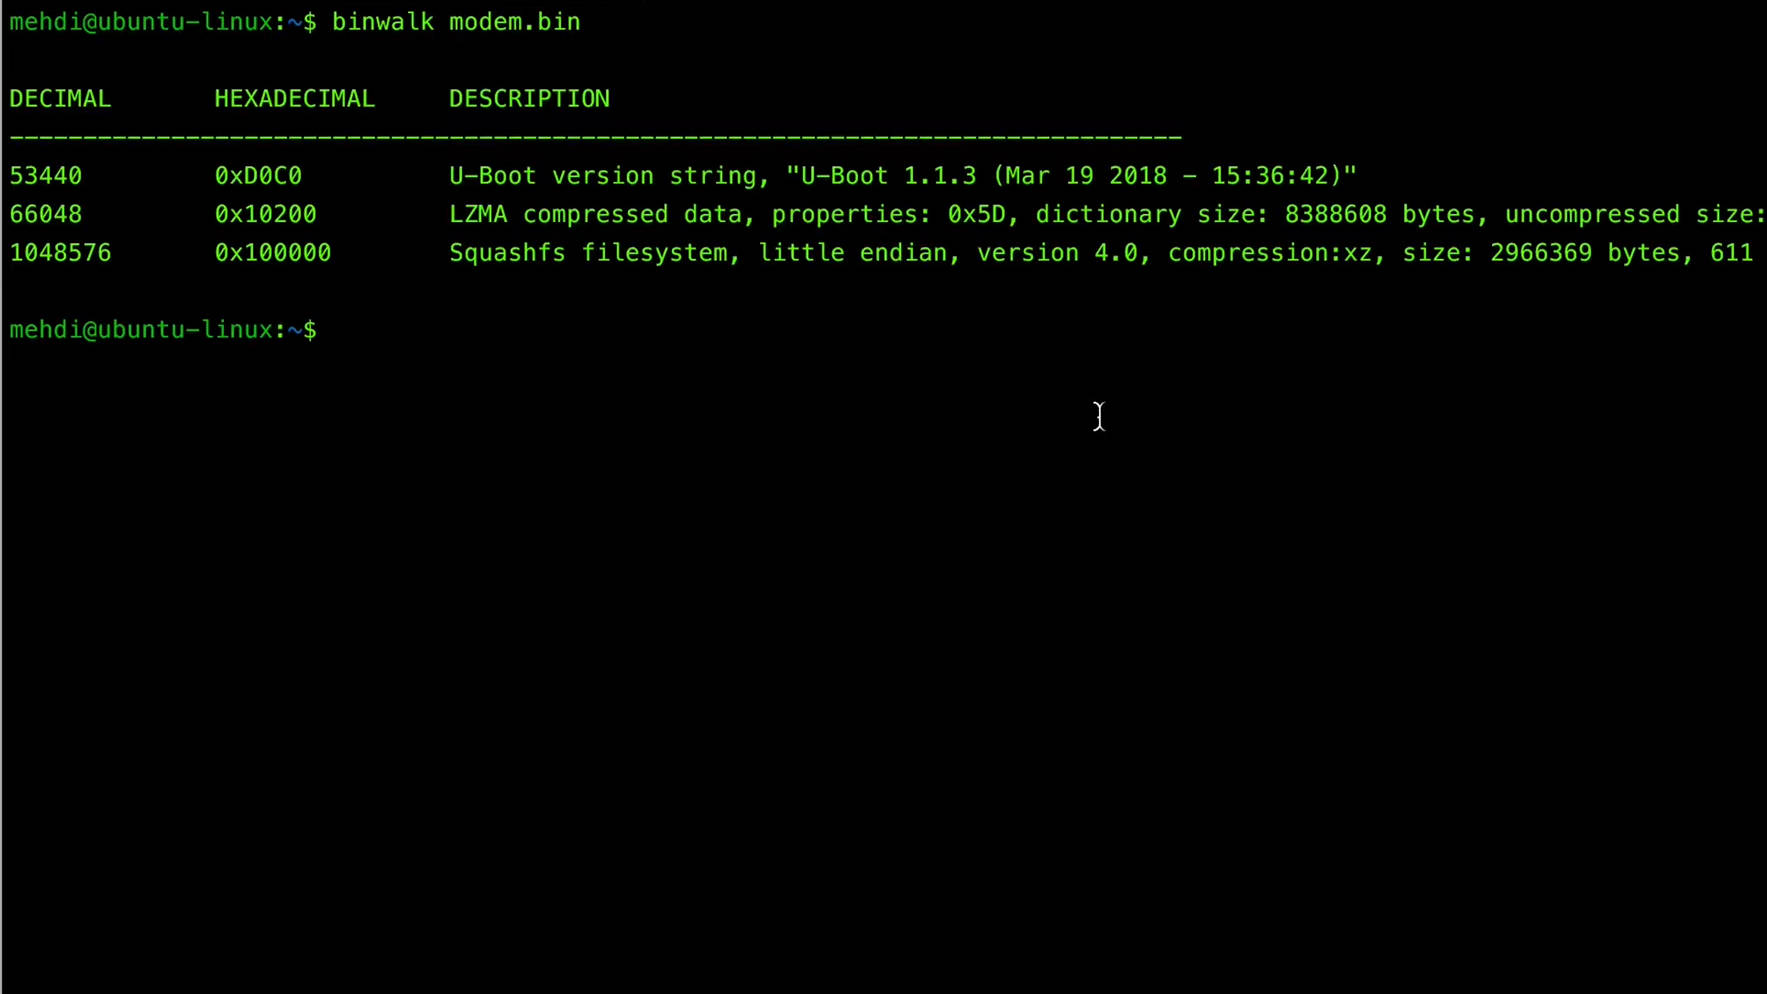
Practical Example: Analyzing Firmware with Binwalk
- Open the Firmware File: Use Binwalk to open the firmware file you extracted.
- Identify Sections: Binwalk will identify different sections of the firmware, such as file systems, compressed data, and executables.
- Extract Files: Use Binwalk to extract embedded file systems and executables for further analysis.
- Analyze Code: Use a disassembler like Ghidra to analyze the extracted executables and look for potential vulnerabilities or interesting features.
Dumping firmware can sometimes feel like playing a high-stakes game of Operation. One wrong move, and you might zap the chip. But when you succeed, it’s like hearing the game buzz in triumph.
Conclusion
Modifying firmware is a powerful skill that can unlock new possibilities for your devices. Whether you’re adding new features, improving security, or simply exploring the inner workings of hardware, the knowledge you gain through firmware modification is invaluable.
The Bigger Picture
Firmware modification is not just about tweaking gadgets. It’s about taking control of the technology that surrounds us. In a world where devices are becoming more complex and interconnected, having the ability to understand and modify firmware gives you a significant edge.
Final Thoughts
As you continue on your journey in hardware security, remember that every device has a story to tell. By learning to extract, analyze, and modify firmware, you’re not just unlocking features or fixing bugs—you’re uncovering the secrets hidden within the hardware.
So, keep exploring, stay curious, and never stop learning. The world of hardware security is vast and full of surprises. And who knows? Maybe one day, you’ll be the one sharing your adventures and helping others on their journey.
The Future of Hardware Security
As technology continues to advance, the need for skilled individuals in hardware security will only grow. By staying informed and continuously learning, you can be at the forefront of this exciting and vital field. Whether you’re securing your own devices or helping others protect theirs, your efforts make a difference.
Additional Resources
- Online Communities: Sites like Stack Overflow, Reddit’s r/hardwarehacking, and Hackaday.io are great places to ask questions and share knowledge.
- Books: “Hacking the Xbox” by Andrew Huang and “The Hardware Hacker” by Bunnie Huang are excellent reads for diving deeper into hardware hacking.
- Courses: Platforms like Coursera, Udacity, and even YouTube offer courses on hardware security and firmware modification.